To write sql, we’ll take all the information we’ve compiled in the previous articles and map it to the appropriate SELECT clause. The series starts with this introductory article.
All the examples for this lesson are based on Microsoft SQL Server Management Studio and the AdventureWorks2012 database. You can get started using these free tools using my Guide Getting Started Using SQL Server.
Write SQL
Now that you have your goal defined in terms of a good question it is time to start to hone in on the specifics. To do this we are going to work through the general structure of SQL:
- Select List – What columns do we want to include in our query?
- Join Conditions – What tables are needed to display those columns? Are other tables, such as bridge tables required to “navigate” to those tables?
- Where Clause – Are there any filter conditions we want to consider? Are the columns we want to filter included in the list of tables? If not, we’ll have to include them in the join conditions.
- Order by – How should the results be sorted?
As we work through the structure, we aren’t going to focus on the actual SQL syntax. That will come later. The goal is to start to identify and collect all the pieces we’ll need to put the puzzle together. We’ll use the SQL Coding Worksheet found in Appendix A.
You will see that it isn’t really hard to fill out one portion of the sheet, and once it is filled out, it is really easy to write the SQL. The worksheet’s secret is that it helps us break down a seemingly complicated problem into it simple parts.
For this section we’ll use the request “List married Employees by name and the departments they have worked in.”
To make our query useful to read we need to specify what columns we want to see. I usually list them along with the table they are found in. For our example we would want to know the Employee Number, Employee Name, Department Name, Date the Employee Started in the Department, and what shift they worked.
Select List
We’ll start by finding the required columns in the Employee Table. There we find the NationalID, but no names! Where are they located?
If you review the EmployeeTable in Microsoft SQL Studio you see there is a foreign key defined on Employee. This “points to” the Person table. That is our hint.
Once you view the Person table’s columns, you see there are First and Last Names.
So far, here is our list:

Initial Columns Identified
As you continue to inspect table names and their foreign keys, you eventually happen across the Department and EmployeeDepartmentHistory tables. From here we obtain the remaining columns from our list.
Here is the final list:
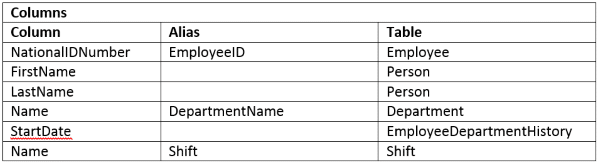
Final Column List
You’ll see I added Aliases for some of the columns and I did so to help differentiate them from similarly named columns in other tables.
Join Conditions
Now that we have identified the columns to display and their source tables, it is time to understand how these tables are related to one another. Usually I do this step at the same time I’m identifying the columns, but it is easier to explain it as a separate step.
Here is what I do.
First, as I’m identifying the columns and tables, I keep a separate note of the tables used and how they are related. If it gets too overwhelming I’ll draw a simple picture to help me visualize the interconnections.
Usually once I’m done identifying the columns I’ll end up with a list as so:

Initial Table Relationships
This is a pretty good start, but there is one relationship missing.
If you look you’ll see there is no start and end between the Employee and EmployeeHistory table. This brings up a really good reason why I like to create diagrams when I can keep it all straight in my head. If you diagram this out, all the tables should be listed on the page and chained together.
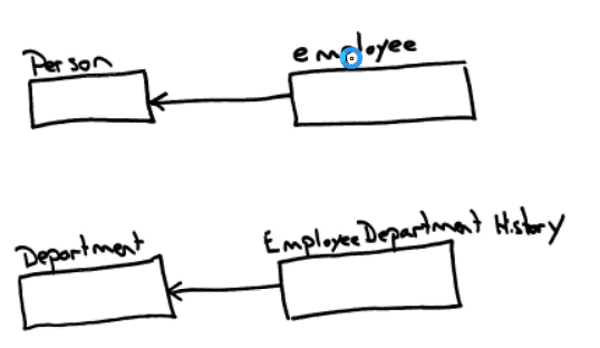
Table Relationship Thus Far
A warning flag should go up if the chain isn’t complete. In this diagram you’ll notice there is no relationship between Employee and EmployeeDepartmentHistory.

Table Relationships Work in Progress
Once the relationships are identified it is time to understand how the tables are exactly linked. Here are the ticks I use to quickly identify the correct columns:
- Are there similarly named columns in both tables? If you have two tables, Order and OrderDetail, and both tables have a column named OrderID, chances are that column is used to relate the tables together.
- Is one of the columns a Primary Key in its table? Finding the set of columns which identifies the primary key is important. This set, one or more columns, will show up in other tables as foreign keys. This is important as primary key and foreign key pairs form the relationships we are seeking.
Let try to use these to identify the columns used in our table’s relationship.
Employee table
When identifying the relationship between the Employee and Person table, the first thing I noticed was that each table had a column name BusinessEntityID. The column was a primary key in both tables. This led me to infer this column is used to relate the two tables together. I confirmed this by reviewing the table’s keys. In the Employee table I found a definition named FK_Employee_Person_BusinessEntityID. Just by reading the name I assumed I nailed the relationship, but I opened the definition to be safe and was able to confirm my hunch.

Employee Relationship Definition
Result: The Employee table is related to the Person table by BusinessEntityID. Since both columns are primary keys, there is a one-to-one relationship between the tables.
Department
The next table in our list is the Department table. We already know this table is related to the EmployeeDepartmentHistory table, but how?
Again, let look at the columns and make some inferences. I think it is easiest to explain this one visually. I opened Microsoft SQL Studio and navigated to the Department and EmployeeDepartmentHistory tables and expanded their columns folders. This is what I saw:
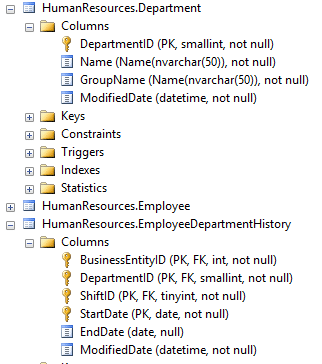
Viewing Columns in Object Explorer
What immediately jumped out was that Department table’s primary key appears in both tables.
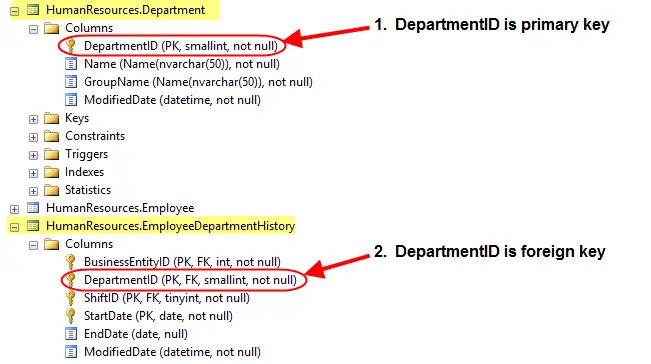
Foreign Key Identification
Being it is a foreign key (FK) in EmployeeDepartmentHistory, I’m sure DepartmentID relates the tables. I confirmed this by looking at the Keys definition.
Result: Department and EmployeeDepartmentHistory are related by the DepartmentID. And since DepartmentID is the primary key in the Department table, we can be sure there is a one to many relationship from Department to EmployeeDepartmentHistory.
Employee (revisited)
The third entry in our list represents the relationship between the Employee table and EmployeeDepartmentHistory.
Using the same techniques we determine the BusinessEntityID is the column relating both tables together.
Here is what our table of relations looks like:
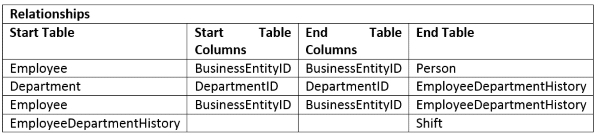
Final Set of Identified Relationshps
Now let’s look to see whether we have to filter any records.
Where Clause
In our statement we said we wanted to “List married Employees…” Most filters are made by comparing column values. Our challenge then, is to find the column and appropriate value to compare.
Since we are talking about marital status, and that’s a property that deals with people, I’ll focus my efforts to the Person and Employee tables.
When I look at the Person table in the explorer I don’t see any relevant columns; however, when I look at the Employee table one field stands out:
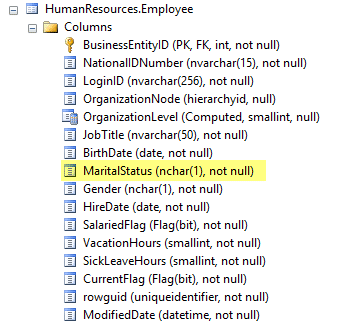
Exploring Columns using the Object Explorer
Now we know the column name, but what is the value for MaritalStatus? I think I could guess…
It is either “Y” for married and “N” for single or “M” for married and “S” for single, but until I look at the data I won’t know. My trick is look at the table’s distinct values as shown below:
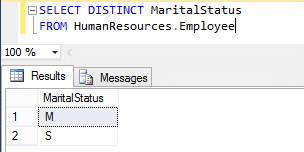
Inspecting A Column’s Distinct Values
Base on this we can infer ‘M’ is used to indicate someone is married.

Summarizing Filter Criteria
Order By
The final item to sort out (no pun intended) is to figure out how to order our results. If you recall, in our original statement we wanted to sort the items by employee name. Let be specific and say we want to sort by last name and then first. Base on this, we can fill out the sort section as:

Sort Results by These Columns
Our worksheet in final form looks like the following:

Completed SQL Worksheet
Build SQL
When working on complicated queries I like to write them in stages. I find that it can be really hard to debug a really complex query. Instead, I like to write a piece, test it, make sure it runs, and then build on that success. Working this way makes it easy to know whether what I just wrote is causing the query to break.
Another strategy I use to start at one end of the query and work towards the other. What I mean is that I think of the related tables strung out in a line and work from the left to the right. In our example, you could use the sketch as a guide as so:
Person à Employee à EmployeeDepartmentHistory à Department
Let’s start with the person table then.
Looking at our worksheet we can see the name comes the person table. Our query starts as
SELECT Person.LastName,
       Person.FirstName
FROM   Person.Person
Also notice we wanted our query to be sorted by Last, and then First Name. Our query now becomes:
SELECT   Person.LastName,
         Person.FirstName
FROM     Person.Person
ORDER BY Person.LastName, Person.FirstName
At this point we need to move on to the Employee table. In order to access columns from this table in a meaningful way we need to create a join between Person and Employee. Looking at our chart, we see these two tables are joined by BusinessEntityID. Since we only want to include rows from both table when there is a match on BusinessEntityID, we’ll use an INNER JOIN.
Our SQL now looks like
SELECT   Person.FirstName
FROM     Person.Person
         INNER JOIN HumanResources.Employee
         ON Person.BusinessEntityID = Employee.BusinessEntityID
ORDER BY Person.LastName, Person.FirstName
Now that we have access to the Employee columns, we can add our filter for the Martial status.
WHERE Employee.MaritalStatus = 'M'
Now we add the join for EmployeeDepartmentHistory.
INNER JOIN
HumanResources.EmployeeDepartmentHistory
On Employee.BusinessEntityID = EmployeeDepartmentHistory.BusinessEntityID
Continuing on to the Department table, we add that relation. Looking at the chart we see that EmployeeDepartmentHistory is related to Department by the DepartmentID. Once these tables are related we can add the department name. Here is the completed query.
SELECT   Person.LastName,
         Person.FirstName,
         Department.Name AS DepartmentName
         FROM     Person.Person
         INNER JOIN
         HumanResources.Employee
         ON Person.BusinessEntityID = Employee.BusinessEntityID
         INNER JOIN
         HumanResources.EmployeeDepartmentHistory
         ON Employee.BusinessEntityID = EmployeeDepartmentHistory.BusinessEntityID
         INNER JOIN
         HumanResources.Department
         ON EmployeeDepartmentHistory.DepartmentID = Department.DepartmentID
WHERE    Employee.MaritalStatus = 'M'
ORDER BY Person.LastName, Person.FirstName;
I know this may seem like a lot to remember, but one you get the hang of writing SQL statements it becomes second nature. I don’t need to use the work sheet anymore, but in the beginning it was really great help. I used it to organize my thought and to piece together which tables and relations were required to complete my query.
What’s Next?
This is one article in a series of four that explain how to organize and write SQL queries. All four articles, including this one, are listed below:
- Introduction to Three Simple Steps to Writing SQL
- Step 1 – Understand your Database Table’s Meanings and Relationships
- Step 2 – Formulate your Question
- Step 3 – Write the Query
The post Write Better SQL – Step 3 of 3 appeared first on Essential SQL.


